By Vince Mrykalo, Technical Editor
Spring/Summer 2008 MPT Journal
An often overlooked facet of action work is thorough key restoration. Let’s look closely at what makes up thorough key work. If you are confronted with a worn out action, you can bet dollars to doughnuts that at least the keys need to be rebushed, the balance holes are elongated, and the key pins and felt punchings are going to need replacement. Do not overlook these items. Further considerations are back rail cloth, key buttons and the obvious key top replacement. Each of those considerations deserve separate articles, which will be forthcoming. If the balance holes are way far gone, a special repair may need to be done on those. This last consideration also calls for a separate article, also forthcoming.
So this is the scenario we will consider this time: replaced key bushings, steaming the balance holes to get them tight again, and then fitting all those keys back on to the key frame. In this particular instance, polishing, not replacing, the key pins were in order, but we did replace the front rail felt punchings with Crescendo front rail punchings. As an aside, I will not go back to using the old cloth front rail punchings again. Everything gets the Crescendos nowadays.
Let’s review some principles of key bushing replacement:
1) Removal is always made easier with the application of 50% wall paper remover and 50% water. Apply several times, or until the glue releases, then a quick application of steam will completely remove the bushing, any glue residue, and will also close up the balance hole. If the wood seems to be a little weak, a follow-up of glue sizing after steaming will be needed (any water based glue will do, just water it down to the tune of 12 parts water to 1 part glue).
2) Always use hot hide glue when gluing in bushing cloth.
3) Use the correct thickness of bushing cloth, along with the right size of bushing cauls. You want to end up with a well-fit bushed mortise-to-keypin relationship.
4) The depth of cloth is crucial here. Not only should it be a certain depth, but consistent from key to key also. The correct depth is 3/16″, both rails. If they are any deeper, you will have to over ease in order to get the keys to move freely. Any shallower, and you will discover they will wear out faster (see photos 1 & 2).
5) After bushings are glued in and dry, ironing them with a key easing iron (cat # KBI-1A) outfit from PianoTek usually gives just the right amount of easing, plus it smoothes out the fibers for a smoother operating key.
6) Key pins can sometimes merely be polished. Other times they will need to be replaced. If they are plated, be sure the plating hasn’t worn off, otherwise it would be wise to replace. I find that new key pins should be polished on a wheel before insertion into the key frame. Really. It makes a big difference.
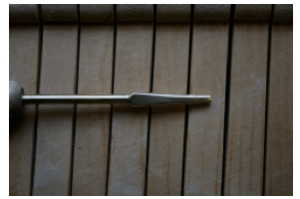
Once all these principles have been met, we come to the business of fitting the keys to the key frame. Don’t overlook careful work from this point on. After all, you have been fastidiously following the above principles up to now, and we want to make all this hard work count. We will usually want to ease the balance hole first, so that the key can be put on its respective pin. You may want to slightly modify your balance hole easer tool. First off, the working end should be flattened all the way to the tip of the triangular head, if it isn’t already that way. The angle of the sides should then be made to be more gradual than it originally comes. Sometimes, depending on the tool, it is too round, and will need to be “flattened” more, by grinding material off. Once those things are taken care of, polish it on a buffing wheel, and you are ready to go (see photo 3 of modified tool).
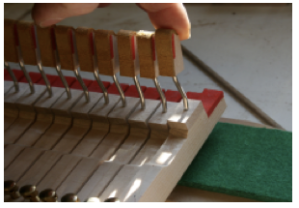
After you have tried putting the key on the balance pin and find that it’s too tight, insert the tool into the hole so that the sides of the hole will be spread by the tool. Don’t overdo this, work patiently. Once the key has been seated to the bottom of the pin (you may have had to ease the bushings a little to get to this point), then test the key’s tightness by lifting the key a scant 1/8″ at the front (see photo 4). You know it has been correctly eased when that key slowly, but definitely falls back to the bottom. But that’s not all. Lifting the key at the rear a scant 1/16″ should produce the similar results, only falling more slowly back to the bottom (see photo 5), since it is usual for the key to be heavier at the front than at the back for most of the keyboard. The danger here is you will have the propensity to over-ease the sides of the balance hole. Once the key slides nicely down the balance pin as you are putting the key on, but when lifting the key at the front (and/or the back), the key stays “up”, you know you are very close to what you want. This is where you want to slightly bevel the balance hole from the inside, using your slightly modified balance hole easer tool. Without putting the tool all the way into the balance hole (from the top), you barely insert it and very carefully begin easing the TOP of the balance hole only, front to back. Over-doing this procedure may cause the recurrence of chucking keys, so do this very gingerly. It’s much easier to show this procedure than to attempt to describe it, but I think you get the idea. If you happen to over ease at this point, then you may have to re-gluesize the hole.
Once this has been done to the whole keyboard, if you can, let it sit overnight, and come back to it on the morrow to touch up any stubborn keys that have decided to become a little too tight again. My friends, this type of work will bring your key work to the next level. This same procedures are used when you are working on a new or nearly new piano. Make those keys operate as they were intended to. Noiseless, firm, and free!
Photo 1: Bushing depth is no more or less than 3/16“
Photo 2: The same goes for the bushing depth of the key button.

Photo 3: The modified balance hole easer tool.

Photo 4: Key is being lifted at the front. No more than 1/8“ lift is needed.

Photo 5: Key is being lifted at the back. No more than 1/16“ lift is needed.

